Integrating Tagify on a web-site
Tagify can auto generate tags/keywords for a content on a web site and this is a step by step guide about how to do it.
Tagify can be integrated onto any web-site in a few simple steps. This page will guide you through all the steps and provide detailed explanation for every step.
The very first step is to authenticate yourself, this can be done via the “Log in” button at the top-right part of the page’s header.

After clicking on it, you will need to go through the normal Google’s authentication flow (yes, authentication in “Tagify” is powered by Google’s accounts).
Register
After the successful authentication, “Log in” button will change into the “Log out” button and will display your user picture.

Also “Register site” will become visible under the top “Tagify” menu item at the top header of the page.

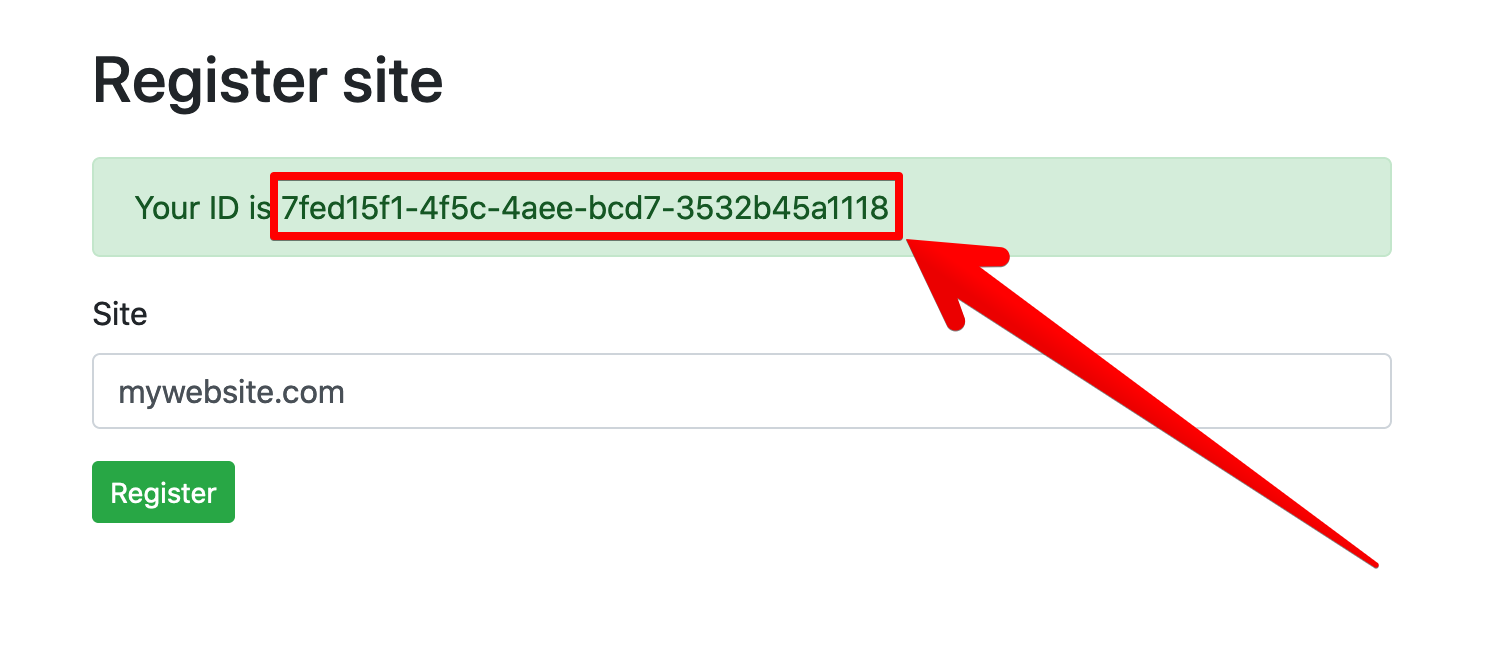
This is the page to register your web-site, so go ahead an click on “Register site”, on the page there will be a form to register a web-site.
Type in target site address and click “Register”, it will generate unique ID for the web-site, keep generated ID, you will need it for integration later.
Tagify
In order to use API provided by Tagify you need to add TagifyJS to your web-site. There are two options.
One of them is to add tagify.js in the <head> section of your web-site, for example:
<!DOCTYPE html>
<html>

<head>
    ...
    <script type="text/javascript" src="https://www.zoomio.org/tagifyjs/tagify.js">
    </script>
    ...
</head>

<body>
    ...
</body>
Another option is to install it via npm install @zoomio/tagifyjs and then import in your *.js or *.ts file:
import { relevant, showLogin, tagsForPage } from '@zoomio/tagifyjs';
Now once you’ve got your web-site registered with the corresponding ID ready and TagifyJS installed you can start Tagifying your content.
Here is how you can do it:
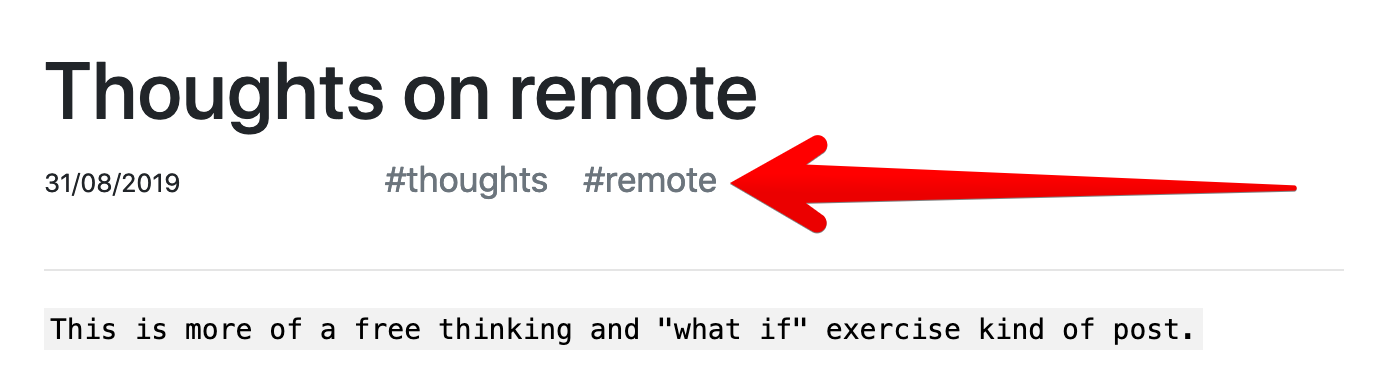
* Tagify a page - show relevant tags for a single page, for example, there are many blog post pages on the web-site, each page, when viewed, has a set of the relevant tags displayed, clicking on a tag shows relevant pages;
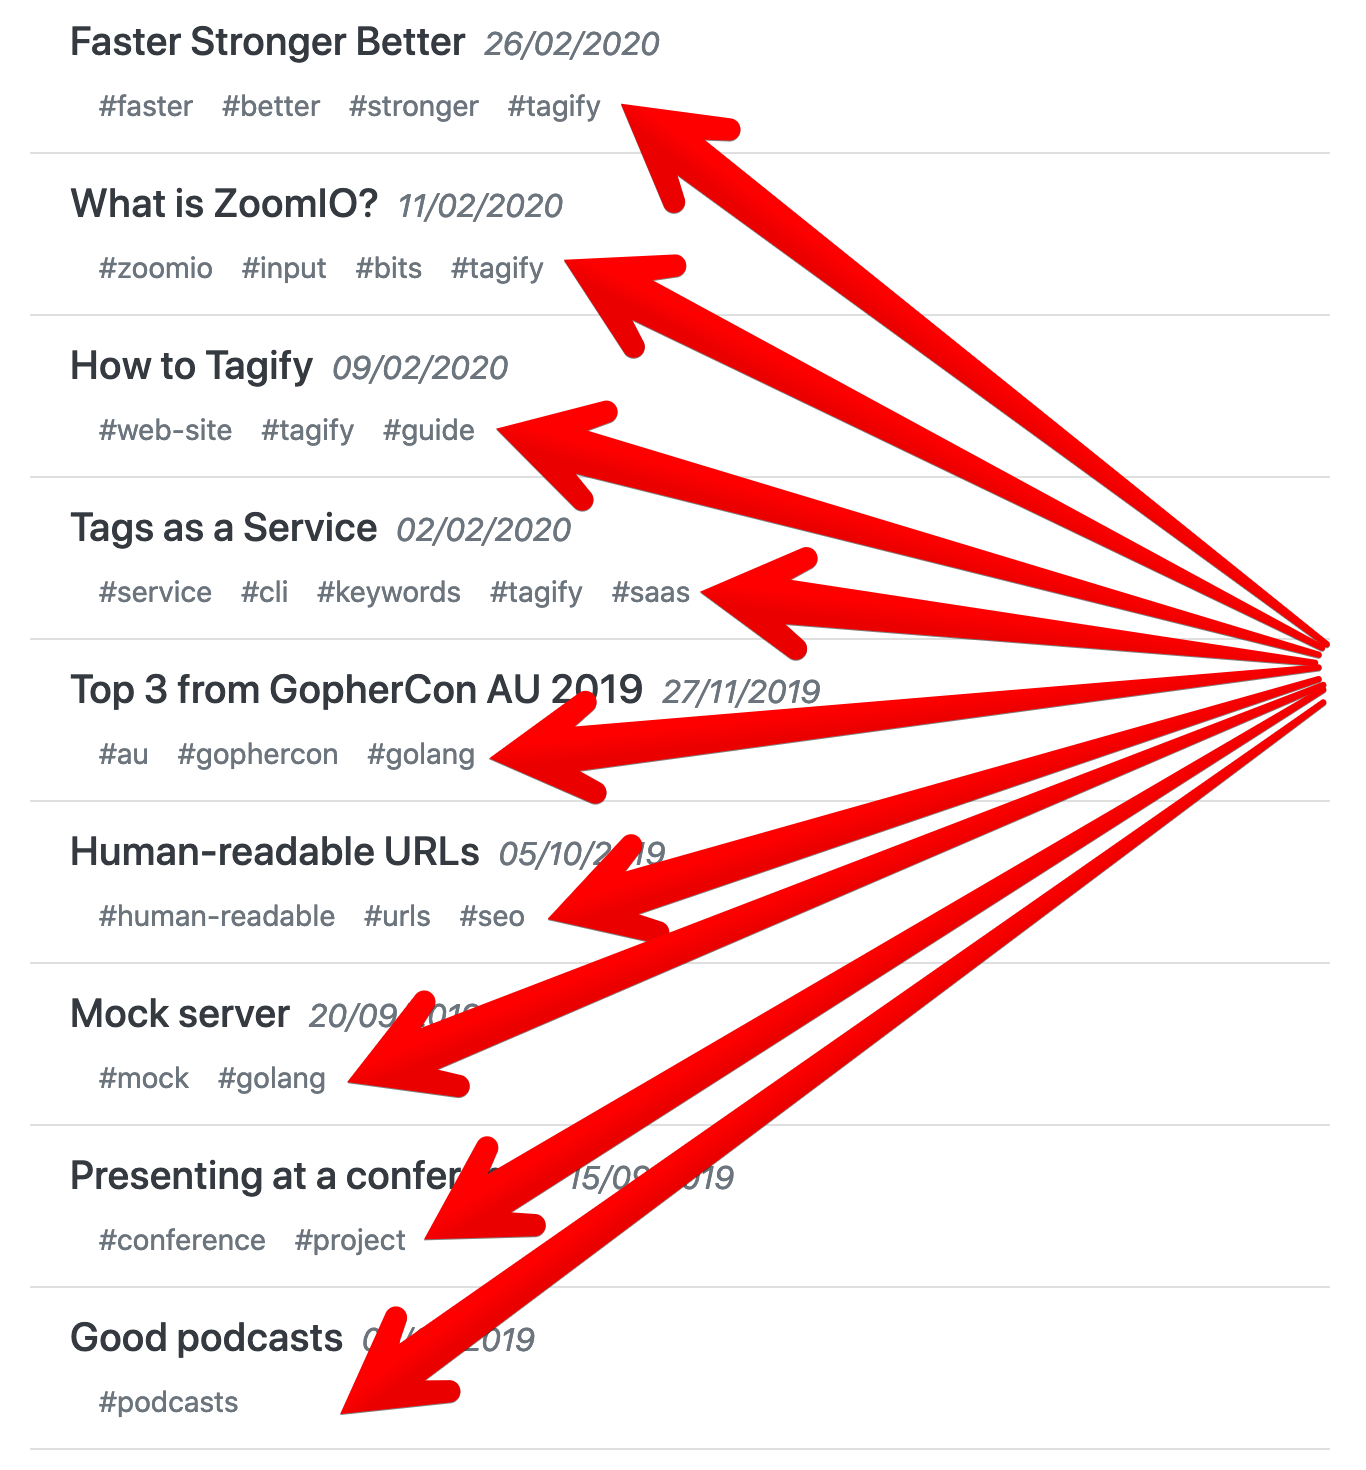
* Tagify a feed or a list of pages - show relevant tags for each list item in the feed, for example, there is a page with a list blog posts, each item in this list has relevant tags displayed, clicking on a tag shows relevant pages;
* Display a list of relevant pages for the tag, for example, when in the list of pages (or in the page with the content) user clicks on the tag
Single page
First you need to put a target container - HTML element where you want tags to be shown, for example:
...
<body>
    ...
    <div class="content">
        <h1>Title of the page</h1>
        <p>Content of the page...</p>
        <div id="contentTags"></div>
    </div>
    ...
</body>
Then call tagsForPage to put tags into the target container (<div id="contentTags"></div> in this case), depending on the way TagifyJS is being used it will be either tagifyjs.tagsForPage({...}) in case of the <script> tag in the <head> or just tagsForPage({...}) in case of npm install @zoomio/tagifyjs, for example (<script> tag case on HTML page):
...
<body>
    ...
    <div class="content">
        <h1>Title of the page</h1>
        <p>Content of the page...</p>
        <div id="contentTags"></div>
        <script>
            tagifyjs.tagsForPage({
                appId: '7fed15f1-4f5c-4aee-bcd7-3532b45a1118',
                targetId: 'contentTags',
                relevantUrl: '/relevant.html',
                tagLimit: 3
            });
        </script>
    </div>
    ...
</body>
tagsForPage method accepts following parameters:
* appId - ID of your web-site, the one which needed to be saved before from the “Register site” page;
* targetId - DOM element ID of the target HTML element, the element is <div id="contentTags"></div>, therefore provided ID is - contentTags;
* relevantUrl - is the address of the page to show a list of relevant pages for the clicked tag;
* tagLimit - number of tags to generate, optional, will be set to 5 if no value has been provided.
Once it’s done you will see generated tags for the page.
List of pages
Similar to the single page, you can tagify a list of pages. Put target container (<div class="content-tags"></div>) for each element in the list:
...
<body>
    ...
    <div class="content">

        <a class="content-link" href="/most-recent-page.html">Most recent page</a>
        <div class="content-tags"></div>

        <a class="content-link" href="/second-page.html">Second page</a>
        <div class="content-tags"></div>

        <a class="content-link" href="/oldest-page.html">Oldest page</a>
        <div class="content-tags"></div>

    </div>
    ...
</body>
This setup will allow to generate tags for every page in the list, to render tags use tagsForAnchors. The idea is the same as with the tagsForPage, depending on the way TagifyJS is installed it is either tagifyjs.tagsForAnchors({...}) (script tag) or just tagsForAnchors({...}) (NPM install), this example is for HTML script tag:
...
<body>
    ...
    <div class="content">

        <h1>Page list</h1>

        <a class="content-link" href="/most-recent-page.html">Most recent page</a>
        <div class="content-tags"></div>

        <a class="content-link" href="/second-page.html">Second page</a>
        <div class="content-tags"></div>

        <a class="content-link" href="/oldest-page.html">Oldest page</a>
        <div class="content-tags"></div>

        <script>
            tagifyjs.tagsForAnchors({
                appId: '7fed15f1-4f5c-4aee-bcd7-3532b45a1118',
                anchorsClassName: 'content-link',
                targetsClassName: 'content-tags',
                relevantUrl: '/relevant.html',
                tagLimit: 3
            });
        </script>

    </div>
    ...
</body>
tagsForAnchors parameters:
* appId - ID of your web-site, the one which needed to be saved before from the “Register site” page;
* anchorsClassName - DOM element class name of the source HTML anchor elements - <a class="content-link" href="...">...</a> - content-link;
* targetsClassName - DOM element class name of the target HTML elements - <div class="content-tags"></div> - content-tags;
* relevantUrl - is the address of the page to show a list of relevant pages for the clicked tag;
* tagLimit - number of tags to generate, optional, will be set to 5 if no value has been provided.
Relevant pages

Final step is to create a page for showing relevant stuff. The page for relevant should be under the URL you’ve set before in relevantUrl parameter of the tagsForPage and tagsForAnchors methods (in our case it is /relevant.html). Again, it needs a container to put the relevant list in:
...
<body>
    ...
    <div class="content">
        <h1>Relevant pages</h1>
        <div id="contentRelevant"></div>
    </div>
    ...
</body>
And then call relevant after the targeted element (<div id="contentRelevant"></div>):
...
<body>
    ...
    <div class="content">
        <h1>Relevant pages</h1>
        <div id="contentRelevant"></div>
        <script>
            tagifyjs.relevant({
                appId: '7fed15f1-4f5c-4aee-bcd7-3532b45a1118',
                targetId: 'contentRelevant'
            });
        </script>
    </div>
    ...
</body>
relevant parameters:
* appId - ID of your web-site, the one which needed to be saved before from the “Register site” page;
* targetId - DOM element ID of the target HTML element - <div id="contentRelevant"></div> - contentRelevant.
Congratulations you all setup and already having tags automatically generated for your pages with the Tagify. Though there are situations when there is a need in managing tags for certain page, i.e. delete unwanted tags or add new custom ones, this is is possible too, but it requires authentication. Next section will explain how to do it.
Customize
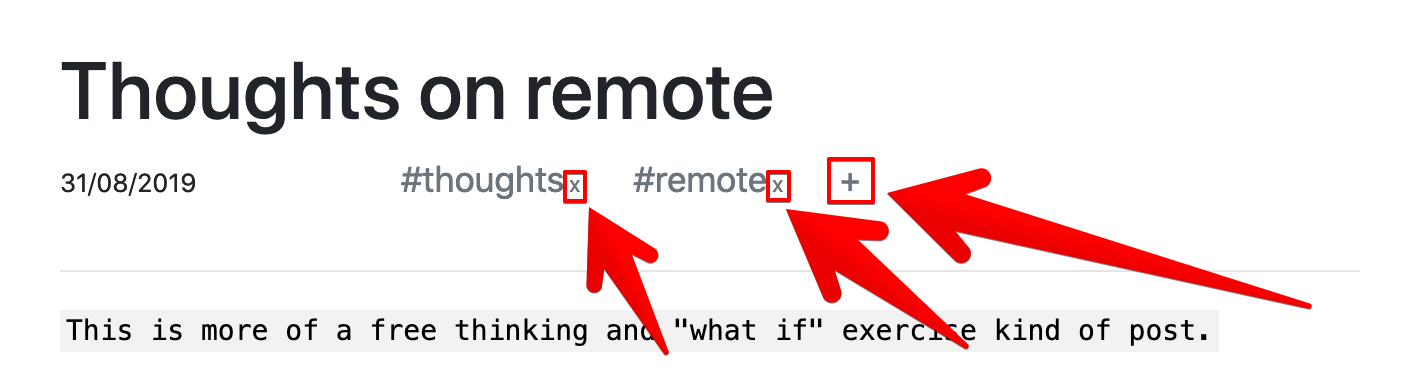
Tags customization is not something that you would want to allow for everyone, i.e. access to tag add/delete feature should be limited to the owner of the web-site (or a person who manages tags). Therefore you will need to put the “Log in” button on your web-site. When clicked, “Log in” button will authorize you with the Google’s authentication flow, once it is finished you will be able to add new custom tags and delete unwanted ones.
showLogin function renders “Log in” button inside the HTML element of your choice:
...
<body>
    ...
    <div class="content">
        ...
        <div id="tagifyLogin"></div>
        <script>
            tagifyjs.showLogin({
                appId: '7fed15f1-4f5c-4aee-bcd7-3532b45a1118',
                targetId: 'tagifyLogin'
            });
        </script>
        ...
    </div>
    ...
</body>
Same idea as previously, put HTML element into your page - <div id="tagifyLogin"></div> and then call showLogin function to display “Log in” button inside it.
showLogin parameters:
* appId - ID of your web-site, the one which needed to be saved before from the “Register site” page;
* targetId - DOM element ID of the target HTML element - <div id="tagifyLogin"></div> - tagifyLogin.
And that’s a wrap, to recap here are the steps to Tagify your web-site:
- Authenticate yourself by clicking “Log in”.
- Register your web-site in “Register site” section.
- Obtain ID for the web-site and save it.
- Install TagifyJS as a
<script>tag in the<head>or vianpm install @zoomio/tagifyjs.
- Tagify a page with the
tagsForPage({...}).
- Tagify a list of pages with the
tagsForAnchors({...}).
- Show relevant pages with the
relevant({...}).
- Enable customization of the generated tags by authorizing yourself with the
showLogin({...}).
Thanks for reading, cheers.